IKEA Hack: How To Attach Lerberg Legs To Linnmon Table
The problem with trestle legs
The IKEA Linnmon / Lerberg desk combination is a fine and simple table, inexpensive and easy to assemble. But here is the problem: there aren’t any accessories included in the box to physically secure the trestle legs to the tabletop—with the only exception of four tiny plastic bumpers that don’t do much in regards to stability.
This is an issue that affects most trestle tables: the boards rest loosely on the trestle legs. Of course, this is not an error, but a design choice.
Historically, a trestle table has been a form of table improvisation, so it follows that modern trestles would have a similar, quick and simple set-up. The main advantage: as the legs are not attached to the board, these tables can be put away easily when not in use.
Having said that, if you own a trestle table with a relatively light tabletop, you’ll probably need a solution to keep it solid and safe—it’s really easy to accidentally kick or push one of the legs or the tabletop during normal use, causing the board to move or slide (which is not only annoying but, also, dangerous).
Described below is a simple DIY fix (one that has worked perfectly for me for several months now).
NOTE: Although I’m using IKEA Lerberg legs for the purpose of this post, this DIY method can be applied to most trestle legs—like Finnvard or Oddvald, also from IKEA—as long as you adjust measurements as per your needs.

IKEA Oddvald trestle legs can also benefit from this DIY solution
The solution—fixing blocks!
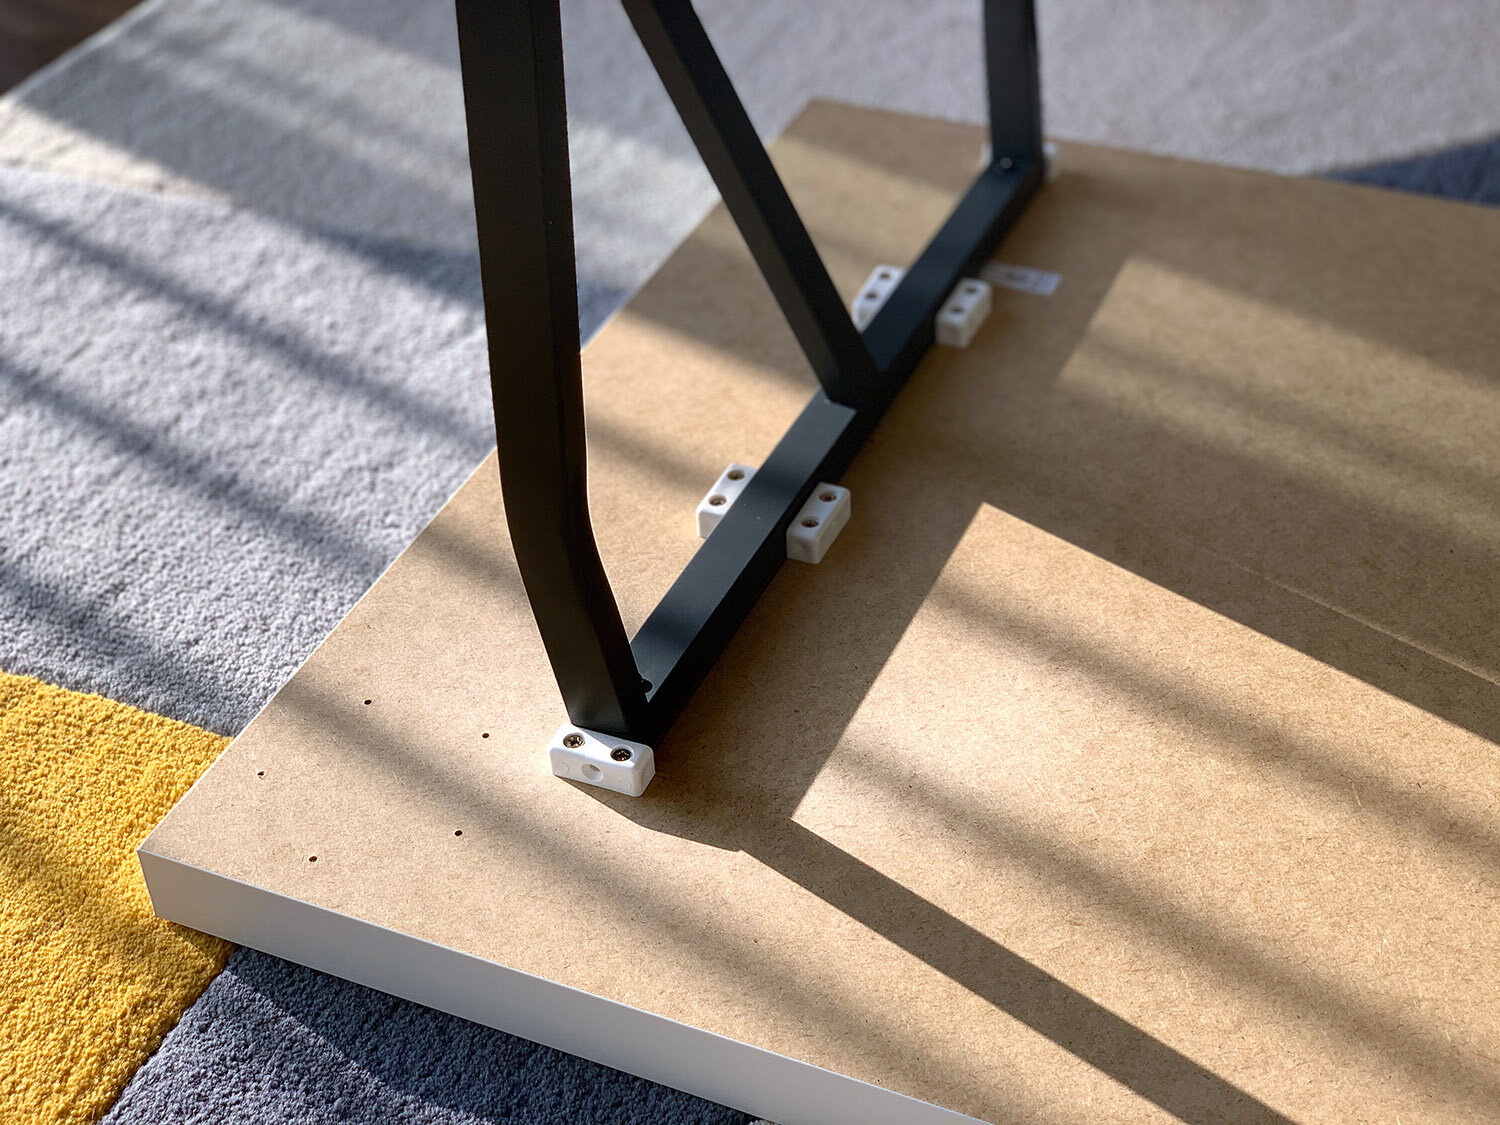
I attached these small plastic blocks to the bottom side of the board, directly surrounding the area where the trestle legs make contact with the tabletop. The result: the blocks contain the top bar of the legs, preventing the tabletop from sliding.
Voilà! The desk is now stable.
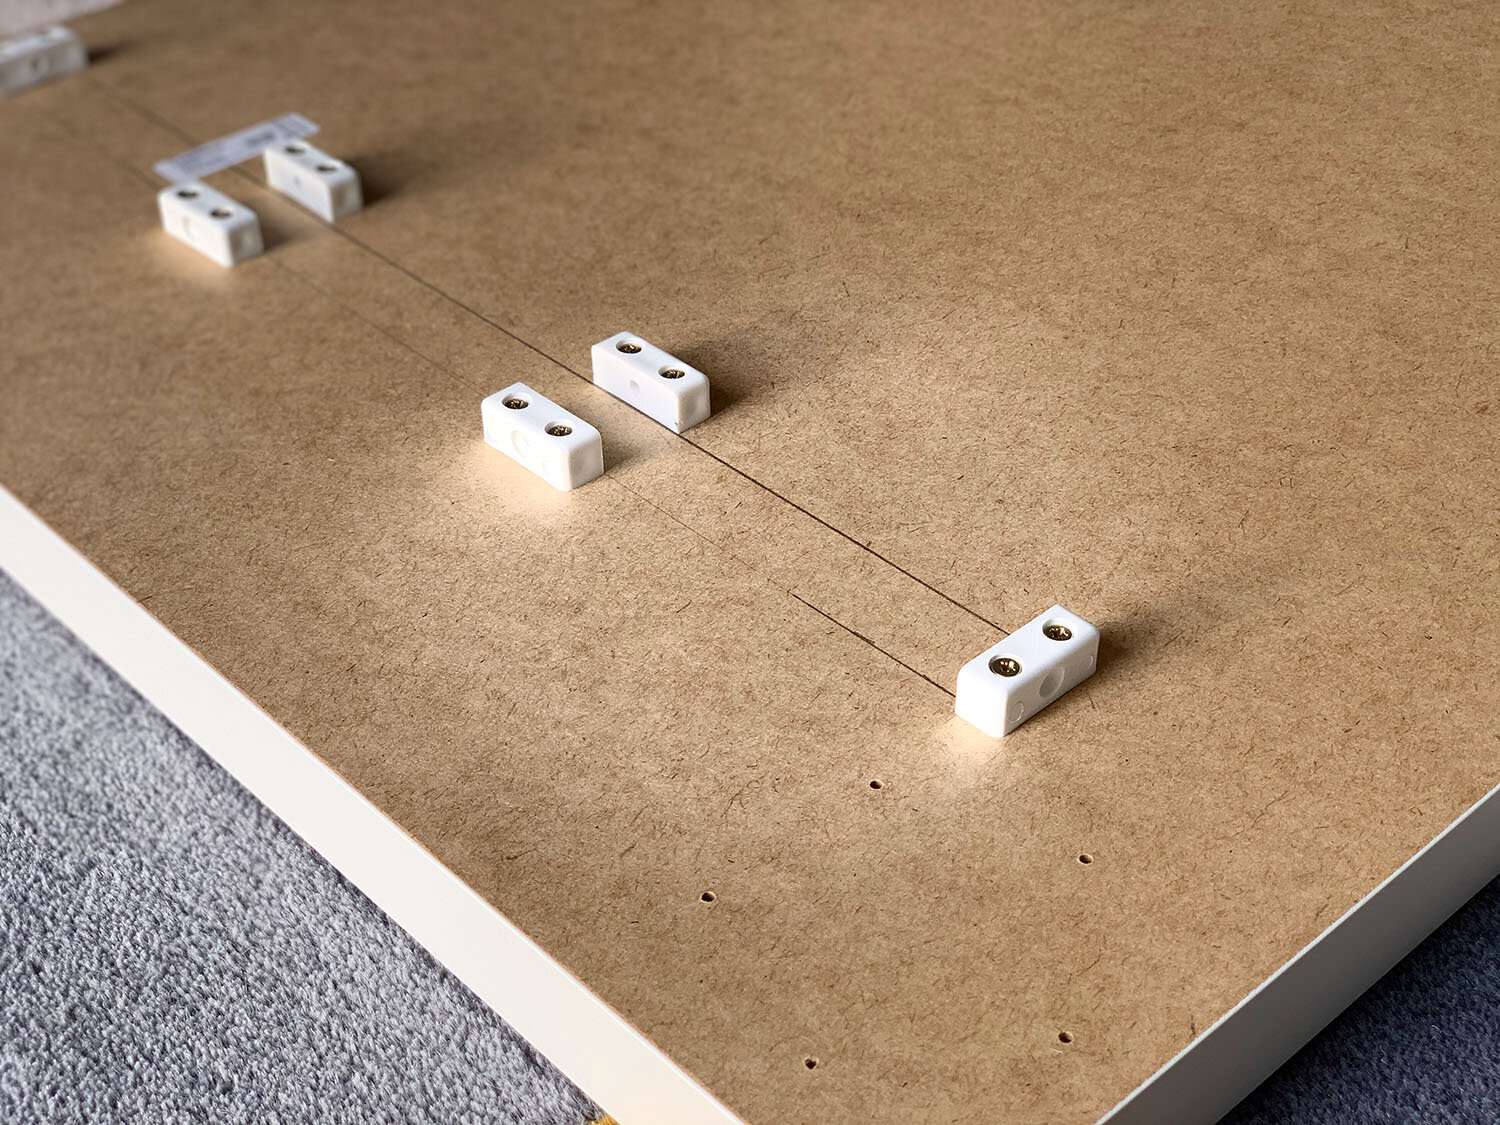
Pencilled outline surrounded by fixing blocks
As a bonus, this solution is truer to the trestle’s original design (as opposed to other methods that attempt to attach the legs permanently to the board)—if you wish to store the desk away, just lift the tabletop. No need to unscrew anything.
One thing worth noting at this point is that many IKEA tabletops are fairly hollow—made with particleboard and paper filling—and trestle legs are, by definition, bigger and heavier than typical table legs. Therefore, if you were to attach the trestle legs directly to this type of tabletops using a different method, it’s likely that the screws wouldn’t hold for long and the desk would become unstable again. That’s why I recommend using fixing blocks: as they are so light, the stress put on the board is minimal.
NOTE: You can order fixing blocks from our Store.
IKEA trestle desk hack—3 easy steps
DISCLAIMER: The DIY steps described in this post will result in the fixing blocks giving support to the trestle legs and tabletop in order to keep the tabletop from sliding. However, the legs won’t be permanently attached to the tabletop. Your table will remain stable and secure as long as you use the desk as intended and apply common sense, as you would with any DIY project.
1. Draw the outline of the Lerberg legs
Lay down the IKEA Linnmon tabletop—or any wooden tabletop that you’re planning to use with the trestle legs—on a flat surface, with the bottom side facing up (ideally on the rug, to avoid scratching the top surface of the desk). Using a pencil, draw an outline of the area where the top bar of the trestle legs will touch the tabletop.
You can use the illustration below as a rough guide—my Linnmon desktop is 100 cm x 60 cm. Please adjust your measurements if your tabletop is of a different size or if you’re using a different style of trestle legs.
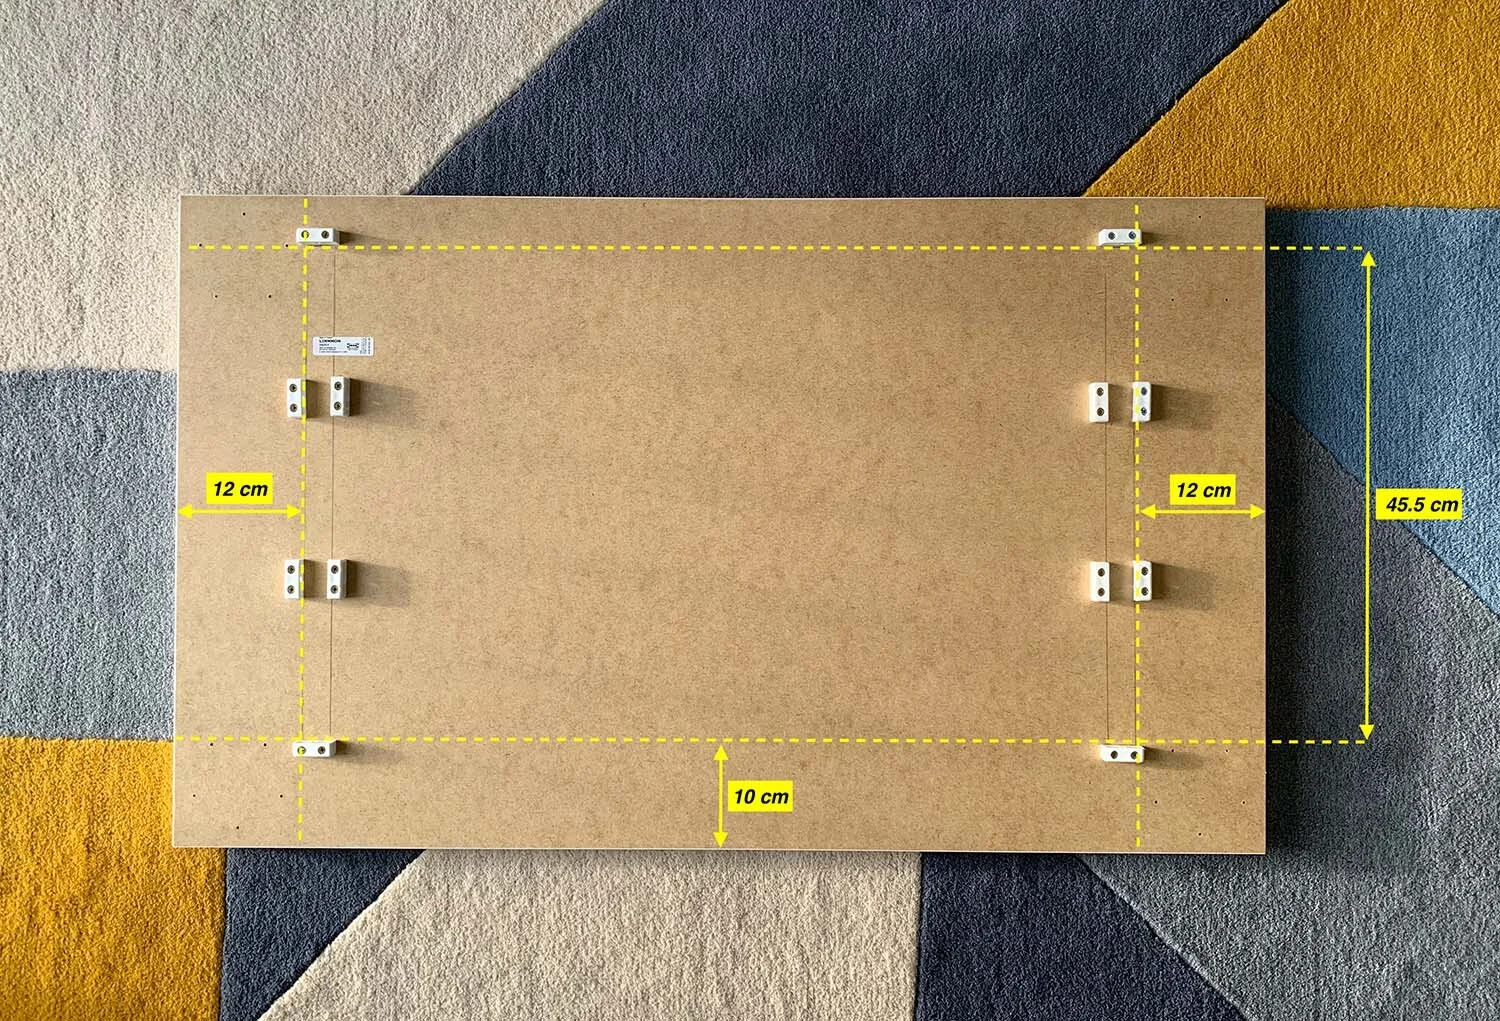
Bottom side of the 100 cm long Linnmon tabletop showing the position of the fixing blocks
As you can see on the illustration, I left a space of about 10 cm on the front side of the desk—the side where I’m sitting—and a little less than that on the opposite side. Having the trestle legs further back allows for more room for my own legs underneath the desk, while at the same time providing extra support for a computer and monitor at the back side of the table.
However, you can position the legs pretty much any place you want, as long as you apply common sense and the desk remains balanced.
2. Attach the blocks to the Linnmon table
Once you have drawn the outline of the trestle legs, position the fixing blocks directly on the outside of that area (see image below). The blocks will be holding the top bar of the trestle legs in place, but without gripping them—i.e. containing the legs somewhat loosely, just enough so the board won’t move once it’s sitting on top of the legs. Test the fit every now and again while you’re attaching the blocks.
Secure each block onto the board using relatively small screws (correct size screws are included in the packs here).
IMPORTANT: You need to find the right type and size of screws for the tabletop you’re using. IKEA tabletops tend to be pretty hollow, so screws that are too big or too small might not hold the fixing blocks in place.

The fixing blocks contain the Lerberg trestle legs in place
3. Place the board on top of the trestle legs
When you have all the fixing blocks attached to the bottom side of the tabletop, turn the board around and place it on top of the legs.
If all went well, the top bar of each trestle leg should fit between the fixing blocks easily, without pushing or pressing. Maybe even with a satisfying perfect fit.

The tabletop stays anchored in place while resting on top of the trestle legs
This solution will allow the desk to remain solid and safe without exerting tension on the materials. And, as the legs won’t be permanently attached to the board, you can easily store the table away, if required.
Done!
Remember to visit our Store if you wish to order the fixing blocks packs.
Related Products

Related Posts